Creating New or Add existing Job to the Job Appointment scheduler.
The job can be directly scheduled to a site worker.
On the desktop
From the desktop main screen, click on "Job Appointment Scheduler".

To add a "New Job".
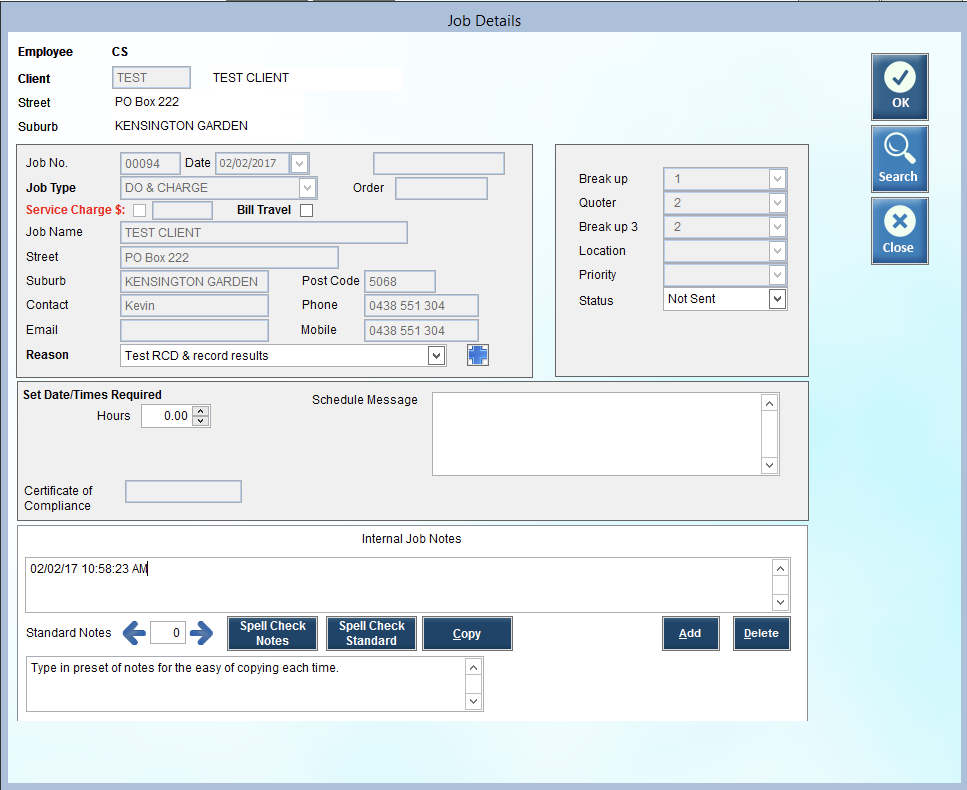
Select the employee that you want to schedule the job to. Find the date (if not today) by using the date picker or the forward day or week arrows.
Find the correct start time in the grid and “left mouse click” to select. Type in the first few letters into the client ID and press enter, the "Client Finder" will appear and you can select the client you are looking for.
If it is new client, you can ADD the new client in through the Client Finder or you can do a client search by clicking on Client Searchat the bottom of the buttons on the right hand side of the screen.
Using the same buttons you can select the "Client Address", New Job Details", "Last Job Details".
Site - This is where you add additional locations which may belong or be managed by your client.
Site - This is where you add additional locations which may belong or be managed by your client.
Select "Job Type" and add "Order number" if required.
Then select your "Reason" for call or type in a new one.(if you want to save the reason click the blue cross button).
Then Select "Break ups"(if turned on), "location" and "Priority". "Status" defaults to Not Sent. If you want to complete a purchase order immediately for this job then tick "Open purchase order on save".
Then select the amount of time the job may require. We recommend you choose a minimum of 1 hour for ease of viewing the jobs on the scheduler.
Then type your "schedule message", this will appear in the jobs list of the Mobile APP as a "RED" exclamation mark when the list is opened against this job number.
Add your internal notes or select the pre-loaded internals notes from the standard notes field by selecting the required number .

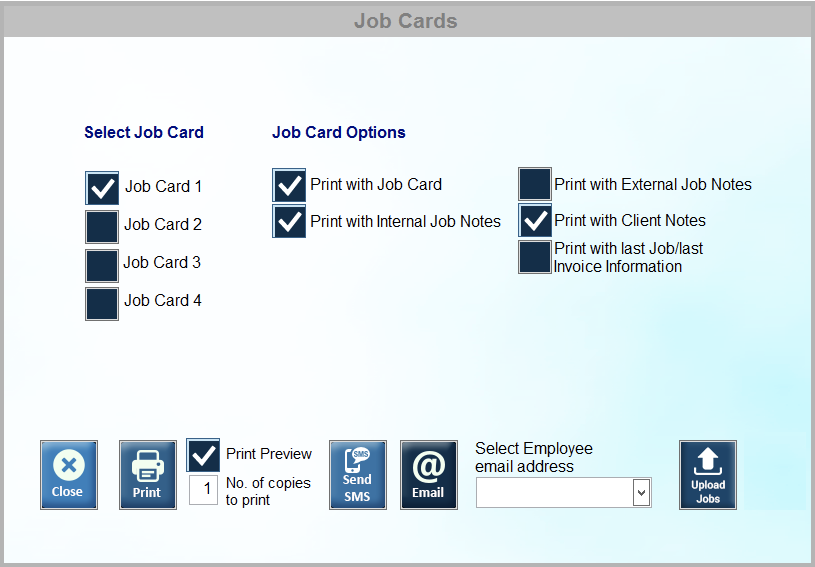
When you click OK, the Job card screen will appear.Select Job card - Choice of 4 types of job cardsJob Card Options - Print Job Card, Print Job card with internal notes, Print job card with External Notes, Print with Client Notes & Print with last Job?last Invoice information. You can select one or all of these.Print option - Select number of copies required and whether you want to preview before printing.Send SMS - Send your Job card via SMS.(This option is an add-on feature - please contact our support office for more information)Email - Send the job via email by selecting the site workers initials, adding any additional information to your email before sending.Upload Jobs - When using the Costmanager mobile APP, select Upload jobs to send the job to the mobile App user.
 Once you have selected how your job card is to be sent this screen will close, if you selected "open purchase order on save" then the purchase order screen will automatically open, will your job no added and ready for you to complete the order.More details click "Here".
To add an "Existing job" right mouse click in the required time slot of the initials required. This opens the "Job Finder".When you select the job number you are requiring, the job details screen appears with most information pre-populated.Leaving you the "Reason for Call", "Time required for the job", "Schedule Message" and "Internal Notes" the only information for you to complete.Once those are completed click OK to save the job and select how you are going to send out the Jobcard.
Once you have selected how your job card is to be sent this screen will close, if you selected "open purchase order on save" then the purchase order screen will automatically open, will your job no added and ready for you to complete the order.More details click "Here".To add an "Existing job" right mouse click in the required time slot of the initials required. This opens the "Job Finder".When you select the job number you are requiring, the job details screen appears with most information pre-populated.Leaving you the "Reason for Call", "Time required for the job", "Schedule Message" and "Internal Notes" the only information for you to complete.Once those are completed click OK to save the job and select how you are going to send out the Jobcard.
To change or move Jobs between Site-workers on the same day.To change the time of job, you can left click hold and drag to the new time slot required either for the same site-worker or another site-worker on the same day.To increase the time for a job, hover over the end of the box you want to increase (until the double ended arrow appears) then "hold left click" and drag to the new time.To change or move Jobs between Site-workers on another day.To move a job from one day to another, right click on the job box and select cut. The job will disappear from the scheduler.Then select the day, time or site-worker you want to move the job to, when hovering over the time right click to paste.Viewing / Deleting Jobs on the schedulerTo view the job details easily by clicking on the "i" icon, which brings up the job details screen where you can edit "Schedule Message" or "Internal Notes".If however you want edit the job details you will need to go to the Job details screen under Jobs/Clients..To delete the schedule click on the red "x" icon. (Note! This does not delete the job only the schedule)\
 To add a "Meeting" hold the Shift key and left mouse click (meeting is for non chargeable time, just a method of blocking out in an initials schedule)

To add a "Meeting" hold the Shift key and left mouse click (meeting is for non chargeable time, just a method of blocking out in an initials schedule)