Create Job from Main screen
click on ADD Job/Quote Button
The new screen Job type will appear, click on the drop down arrow and select from one of the five types listed.
You can choose from: Do & Charge (Suffix - /D), Lumpsum (Suffix - /L), Maintenance (Suffix - /M), Warranty (Suffix - /W) or Quote Only (Suffix - /Q).
We have selected Do & Charge for this help file, therefore our Job No had /D at the end.
Then type a partial search ID into the client ID field and press enter, in this case we added "Tes" and pressed enter.![]()
This opens the client finder screen, where you can select client you are looking for or you can add a new client by clicking on the +Add Client button.
You can search by any of the fields on the left hand side of the screen, Find Client, Name, Street, Suburb, Phone to narrow down the client your are looking for.
When you have found the client, select the line by clicking on Client ID name, once you have selected client ID you can also Edit Client Notes before selecting OK
and returning to the Create Job screen.
The client finder has opened to the first client with the letters Tes in their client ID and lists all clients starting with Tes.
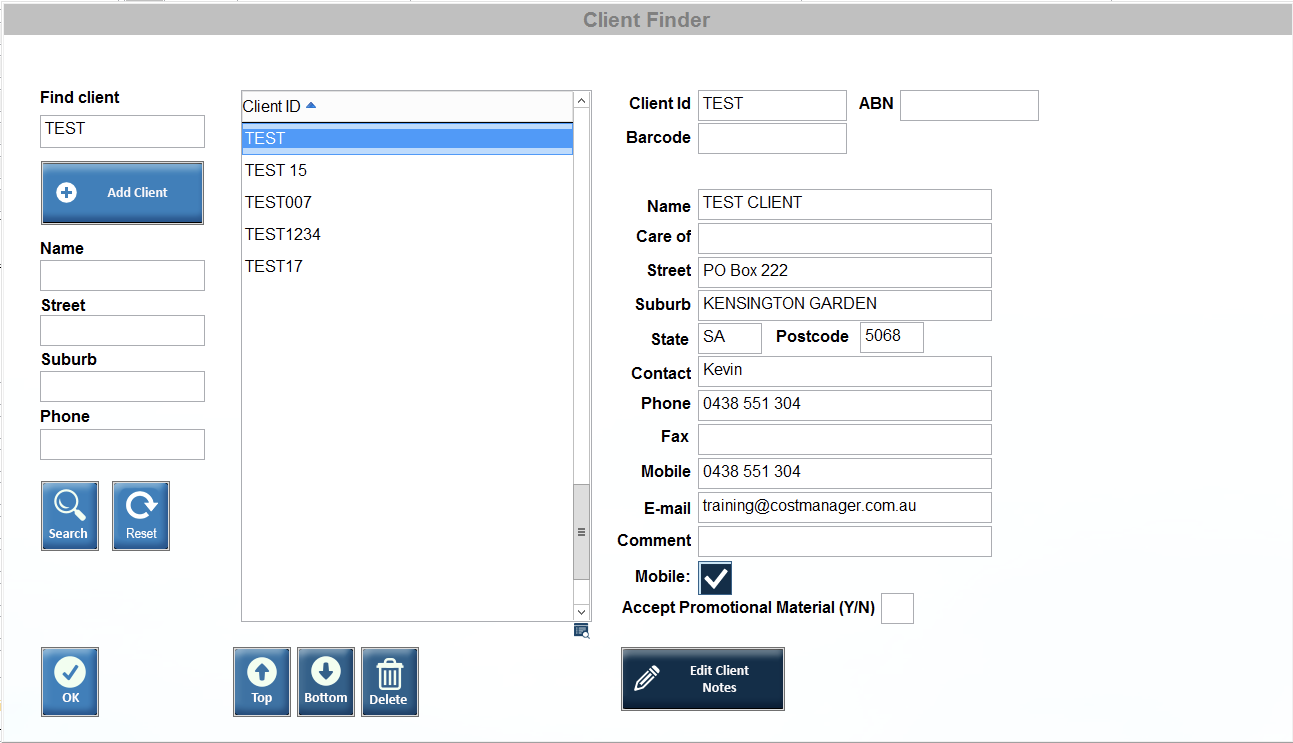 As Test was highlighted already, select OK and you are returned to the Create Job screen. But now the Client details are populated and Job is allocated by Costmanager.We also add in the Contact details Name & numbers next to the order details for this particular order. If you want to change the date (defaults to today date),click the cursor in the date field and use the back arrow to alter.
At this point we have several decisions to make in regards to this particular job.
 Copy Details from another Job/Quote - You can select to Copy details from another Job or Quote, this will open the Copy Job/Quote details screen. You then Select All or Clear All ticks or individually tick or untick the fields you want to select. Then click Choose Job, this opens the Job Finder screen to for you to select the job you want.Copy Details from another Job/Quote - You can select to Copy details from another Job or Quote, this will open the Copy Job/Quote details screen. You then Select All or Clear All ticks or individually tick or untick the fields you want to select. Then click Choose Job, this opens the Job Finder screen to for you to select the job you want.
 Selecting details for this particular job.
 Fill below from above details - Copy client details into job details below.Fill below from last job details - Copies Job details from the last job you did for the client.Fill below with new job details - clears all details from the job details area for you to complete new details.Choose Site to fill below - Click here to create a new site location or select one already created. (We selected an existing site to fill the job details).Set Default Options - you can select which is your preferred job details default, you can also select an option to "Go directly to Labour & Materials Input on Job Save". These options can be altered at any time.
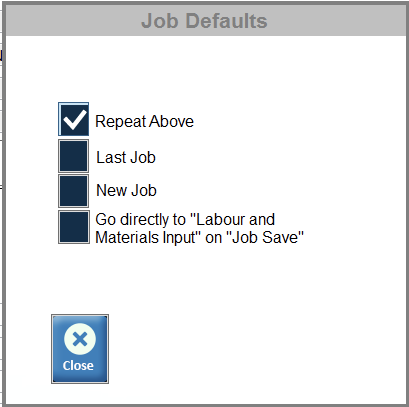 CostManager is set to default to " Repeat Above" as this is the most common choice
 Stock Location - that material will be drawn from.
 Break up - Can be used for location, area, type of work, etc. Break up 1 / Quoter - Can also be used like break up or if you want to know whose quoted what job. If Quoter selected, you have a drop list of staff created in the list.Break up 2 - if used for marketing information and allows you to set up abbreviations EG: FB - Facebook, YP - Yellow Pages, YPO - Yellow Pages online.These break ups allow your to break up your sales reports and gain a greater understanding of your business and where it comes from.
Other Charges
 Service charge - if you tick this box a the service charge will apply. If a default amount is preset then it will appear, but it can be changed anytime by overriding it. (Add service charge set up here)Charge Travel - if this box if you want charge travel against this job.
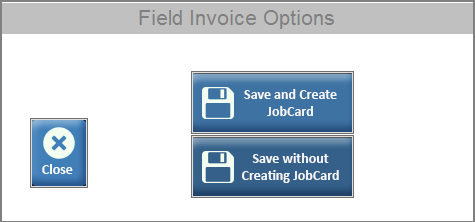
Saving the Job with or without Jobcards or processing a field Invoice
 Save and Create Jobcard - Save the job and creates Job card to be sent out or printed.Save without Creating Jobcard - Saves job and closes the screen.Go to Field Entry Invoice - For companies who use manual invoice books and then complete invoices in the office afterwards. Click this button opens "Field Invoice Options".
Field Invoice Options - select whether you want to save the Job with / without a Jobcard.
 This then opens the Field Invoice screen, where you completed all required details from the Field Invoice returned to the office.
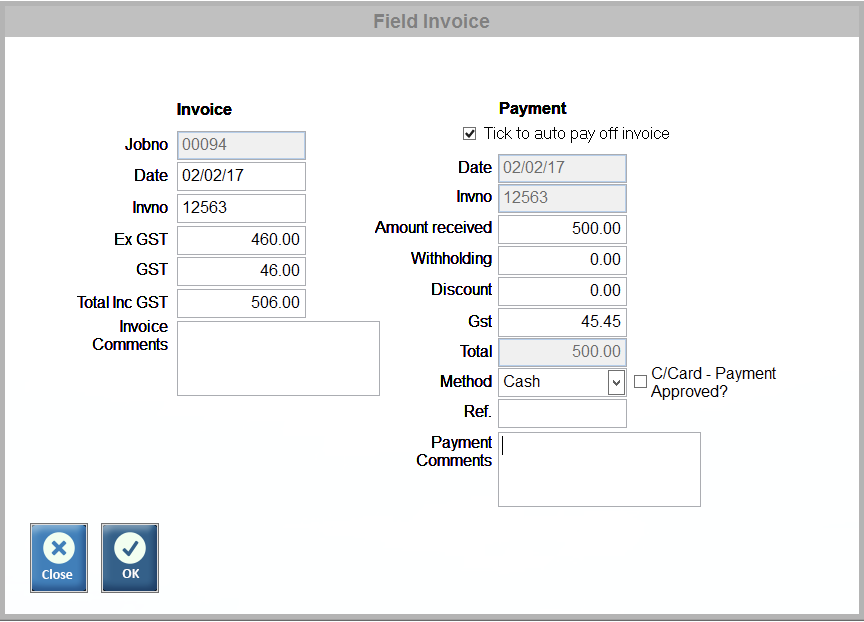 InvoiceJob No - already created by the system.
PaymentTick to auto pay off invoice - defaults to auto pay off invoice.Date - Auto-filledInv. No - Auto-filled.Amount Received - Auto-filled, but can be overriddenWithholding - relates to any amount withheld by the client (retentions)Discount - type in a number here to apply a discount to the invoiceGST - Auto-filled but can be overridden.Total - Auto-filled.Method - select type of payment received. Choose from Cheque, EFT, C/Card, Paypal & Other.Ref. - Add reference information.Payment Comments - Reasons for any change to the invoice value.
As Test was highlighted already, select OK and you are returned to the Create Job screen. But now the Client details are populated and Job is allocated by Costmanager.We also add in the Contact details Name & numbers next to the order details for this particular order. If you want to change the date (defaults to today date),click the cursor in the date field and use the back arrow to alter.At this point we have several decisions to make in regards to this particular job.
Copy Details from another Job/Quote - You can select to Copy details from another Job or Quote, this will open the Copy Job/Quote details screen. You then Select All or Clear All ticks or individually tick or untick the fields you want to select. Then click Choose Job, this opens the Job Finder screen to for you to select the job you want.Copy Details from another Job/Quote - You can select to Copy details from another Job or Quote, this will open the Copy Job/Quote details screen. You then Select All or Clear All ticks or individually tick or untick the fields you want to select. Then click Choose Job, this opens the Job Finder screen to for you to select the job you want.Selecting details for this particular job.Fill below from above details - Copy client details into job details below.Fill below from last job details - Copies Job details from the last job you did for the client.Fill below with new job details - clears all details from the job details area for you to complete new details.Choose Site to fill below - Click here to create a new site location or select one already created. (We selected an existing site to fill the job details).Set Default Options - you can select which is your preferred job details default, you can also select an option to "Go directly to Labour & Materials Input on Job Save". These options can be altered at any time.CostManager is set to default to " Repeat Above" as this is the most common choiceStock Location - that material will be drawn from. Break up - Can be used for location, area, type of work, etc. Break up 1 / Quoter - Can also be used like break up or if you want to know whose quoted what job. If Quoter selected, you have a drop list of staff created in the list.Break up 2 - if used for marketing information and allows you to set up abbreviations EG: FB - Facebook, YP - Yellow Pages, YPO - Yellow Pages online.These break ups allow your to break up your sales reports and gain a greater understanding of your business and where it comes from.Other Charges
Service charge - if you tick this box a the service charge will apply. If a default amount is preset then it will appear, but it can be changed anytime by overriding it. (Add service charge set up here)Charge Travel - if this box if you want charge travel against this job.Saving the Job with or without Jobcards or processing a field Invoice
Save and Create Jobcard - Save the job and creates Job card to be sent out or printed.Save without Creating Jobcard - Saves job and closes the screen.Go to Field Entry Invoice - For companies who use manual invoice books and then complete invoices in the office afterwards. Click this button opens "Field Invoice Options".Field Invoice Options - select whether you want to save the Job with / without a Jobcard.
This then opens the Field Invoice screen, where you completed all required details from the Field Invoice returned to the office.InvoiceJob No - already created by the system.PaymentTick to auto pay off invoice - defaults to auto pay off invoice.Date - Auto-filledInv. No - Auto-filled.Amount Received - Auto-filled, but can be overriddenWithholding - relates to any amount withheld by the client (retentions)Discount - type in a number here to apply a discount to the invoiceGST - Auto-filled but can be overridden.Total - Auto-filled.Method - select type of payment received. Choose from Cheque, EFT, C/Card, Paypal & Other.Ref. - Add reference information.Payment Comments - Reasons for any change to the invoice value.